Google Forms is one of the most powerful and user-friendly tools for creating surveys, quizzes, and data collection forms. Whether you are a business owner, educator, or researcher, Google Forms offers a free and efficient way to collect and analyze responses in real time. In this guide, we will walk you through the process of setting up and managing Google Forms effectively.
Why Use Google Forms?
Google Forms is widely used for several reasons:
- Free and Easy to Use – Google Forms is available for free and has an intuitive interface that requires no technical expertise.
- Real-Time Data Collection – Responses are stored instantly in Google Sheets, making it easy to analyze data.
- Customization Options – Users can customize themes, add images, videos, and various question types.
- Seamless Integration – Works well with other Google apps like Google Sheets, Google Drive, and Gmail.
- Collaboration-Friendly – Multiple users can work on the same form in real-time.
- Mobile-Friendly – Google Forms can be accessed and completed on any device, ensuring accessibility for respondents.
How to Create a Google Form
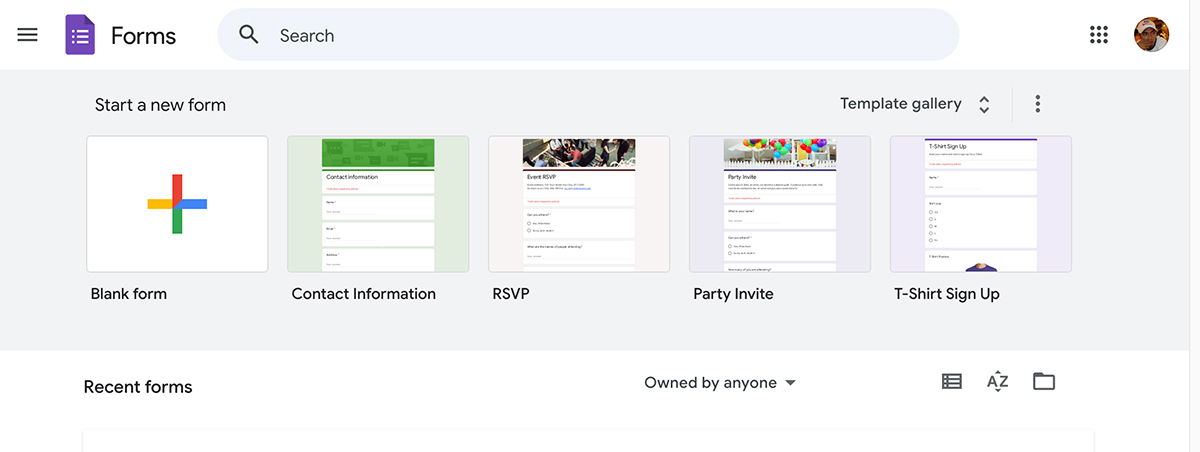
Step 1: Access Google Forms
To start using Google Forms:
- Go to Google Forms.
- Sign in with your Google account.
- Click the blank form or choose a template from the template gallery.
Step 2: Customize Your Form
Once you have created a blank form, follow these steps to customize it:
- Title and Description – Click on the default title (“Untitled Form”) and enter a relevant title and description.
- Add Questions – Click the “+” icon to add new questions.
- Choose Question Types – Google Forms provides multiple question types:
- Short answer – Best for collecting names, emails, or brief responses.
- Paragraph – Useful for open-ended responses.
- Multiple choice – Allows users to select one answer from a list.
- Checkboxes – Lets users select multiple options.
- Drop-down – Ideal for compact lists of choices.
- Linear scale – Used for rating or scoring systems.
- Multiple choice grid – Useful for comparing multiple items.
- Enable Required Fields – To ensure users answer mandatory questions, toggle the “Required” button.
- Add Sections – Organize your form by adding sections to separate different topics or categories.
Step 3: Customize the Appearance
- Click on the palette icon at the top to change the theme and background color.
- Add a custom header image to match your branding.
- Choose a font style that suits your form.
Managing Google Forms
Sharing and Collecting Responses
After creating your form, you need to share it for data collection:
- Click the Publish button.
- Configure sharing settings:
- Manage access: Specify who can respond by adding individuals or groups.
- Notify people: Optionally, send email notifications to respondents with a personalized message.
- Finalize by clicking “Publish” or “Publish and notify.”
- View Responses in Real Time:
- Responses are automatically collected in Google Forms.
- Click the “Responses” tab to see a summary of answers.
- Link responses to Google Sheets for detailed analysis.
- Use the “Download responses” option to export data as a CSV file for external processing.
Analyzing Responses
Google Forms automatically collects and organizes responses:
- Click on the Responses tab to view collected data.
- Open responses in Google Sheets for advanced analysis.
- Use built-in charts and graphs for quick insights.
- Export responses as a CSV file for external data analysis.
Enabling Notifications
To get notified when someone submits a response:
- Click on the Responses tab.
- Click the three-dot menu and select Get email notifications for new responses.
Advanced Features
Adding Logic with Conditional Questions
You can guide users through different paths based on their responses:
- Use the “Go to section based on answer” feature to direct users to specific questions.
- Hide or reveal questions dynamically using conditional logic.
Integrating with Google Sheets
- Click the Google Sheets icon to link your form responses directly to a spreadsheet.
- Use formulas, pivot tables, and charts for in-depth analysis.
- Apply filters to sort and categorize data easily.
Using Add-Ons
Enhance functionality with Google Forms add-ons:
- Form Publisher – Converts responses into Google Docs or PDFs.
- FormLimiter – Limits the number of responses.
- Choice Eliminator – Removes answer choices after they are selected.
- Timer for Google Forms – Adds a countdown timer for quizzes and assessments.
Setting Up Automated Responses
Use Google Forms with Google Apps Script or third-party tools like Zapier to send automated emails upon form submission.
Embedding Google Forms in Websites
To embed a Google Form on your website:
- Click Send and go to the Embed HTML option.
- Copy the code and paste it into your website’s HTML.
- Adjust the height and width as needed.
Best Practices for Using Google Forms
- Keep Forms Simple – Avoid unnecessary questions to improve response rates.
- Test Your Form – Submit a few test responses to check functionality.
- Use Required Questions Wisely – Only mark essential questions as required.
- Regularly Check Responses – Monitor and analyze data frequently.
- Enable Captcha – Prevent spam responses by enabling reCAPTCHA.
- Use Descriptive Labels – Make questions and answer choices clear.
- Provide Clear Instructions – Guide respondents on how to fill out the form correctly.
- Ensure Mobile Compatibility – Preview your form on different devices to ensure it works well.
Conclusion
Google Forms is a versatile and powerful tool for surveys and data collection. By following the steps above, you can create and manage forms efficiently while leveraging its advanced features for better insights. Whether you need a simple feedback form or a detailed survey, Google Forms can streamline your data collection process effortlessly. With features like real-time collaboration, logic branching, and automatic data analysis, it remains one of the best tools for gathering information effectively.
Read Also: Google Slides | The Ultimate Guide to Creating Stunning Presentations