
If you’ve ever tried adjusting numbers again and again in a spreadsheet just to reach a specific result, you’re not alone. Fortunately, goal seek in Microsoft Excel eliminates the guesswork. It automatically calculates the exact input needed to achieve your desired output—saving you time and effort.
This detailed guide will walk you through how to use goal seek in Excel step-by-step, with clear explanations, practical examples, and helpful tips to ensure you fully understand how it works.
What Is Goal Seek in Excel?
Goal seek is a built-in What-If Analysis tool in Excel that allows you to determine the value needed in one cell to achieve a specific result in another cell.
In simpler terms:
- You define the target result
- Excel finds the input value required to reach that result
This is especially useful when working with formulas where changing one variable affects the final outcome.
How Goal Seek Works (Simple Explanation)
Goal seek works with three main components:
- Set Cell – This is the cell that contains the formula (the result you want to control).
- To Value – This is the target result you want to achieve.
- By Changing Cell – This is the input cell that Excel will adjust automatically.
Think of it like this:
“I want this result — what number do I need to change to get it?”
When Should You Use Goal Seek?
You should use goal seek when:
- You already have a formula in place
- You know the result you want
- Only one variable needs to be adjusted
Common Use Cases:
- Calculating required sales to hit a target revenue
- Finding the needed exam score to pass
- Determining loan payments or interest rates
- Budget planning and forecasting
Step-by-Step: How to Use Goal Seek in Excel
Let’s go through the process in detail.
Step 1: Set Up Your Worksheet
Before using goal seek, ensure your worksheet includes:
- A formula that calculates a result
- A clearly defined input cell
Example Table:
| Description | Value |
| Price per Unit | 100 |
| Quantity | 10 |
| Total Sales | =B2*B3 |
Here:
- Total Sales is your formula cell
- Quantity is the value you can change
Step 2: Open the Goal Seek Tool
- Click the Data tab in Excel
- Look for the Forecast or Data Tools group
- Click What-If Analysis
- Select Goal Seek

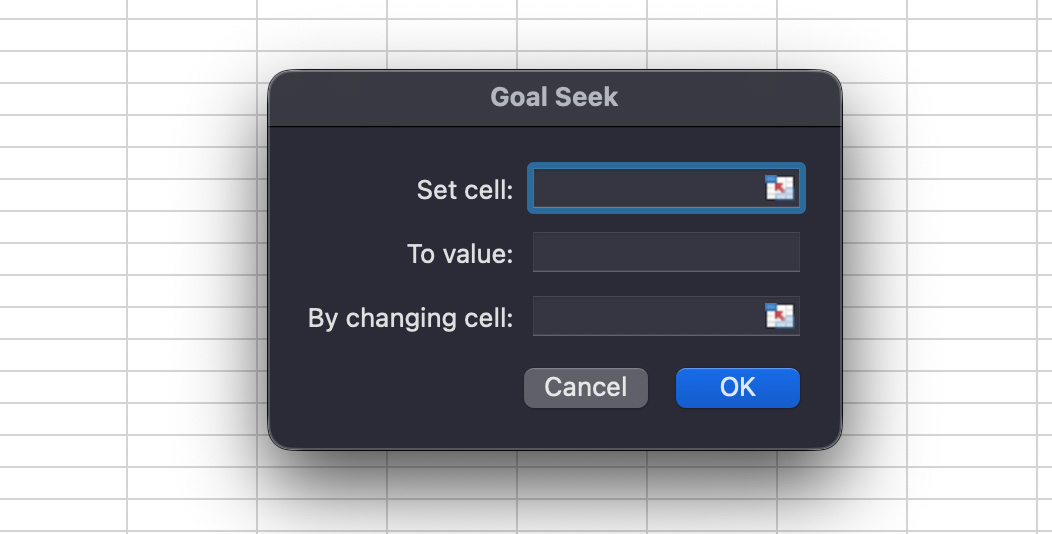
Step 3: Understand the Goal Seek Dialog Box
A small window will appear with three fields:
- Set Cell: The formula cell (e.g., Total Sales)
- To Value: The result you want (e.g., 10000)
- By Changing Cell: The input Excel will modify (e.g., Quantity)
Step 4: Enter the Values
Fill in the fields like this:
- Set Cell: Total Sales
- To Value: 10000
- By Changing Cell: Quantity
Step 5: Run Goal Seek
Click OK, and Excel will:
- Try different values automatically
- Stop once it finds the correct answer
A result box will appear showing whether a solution was found.
Detailed Example 1: Sales Target Calculation
Let’s say you run a small business and want to reach ₱25,000 in sales.
Given:
| Description | Value |
| Price per Unit | 250 |
| Quantity | 20 |
| Total Sales | =250 × Quantity |
Goal: Find how many units you need to sell to reach ₱25,000.
Steps Using Goal Seek:
- Set Cell: Total Sales
- To Value: 25000
- By Changing Cell: Quantity
Result:
Excel calculates:
Quantity = 100 units
This means you must sell 100 items at ₱250 each to hit your sales goal.
Detailed Example 2: Required Exam Score
Imagine you want a final average of 90, but you still have one subject left.
Current Scores:
| Subject | Score |
| Math | 88 |
| English | 92 |
| Science | 85 |
| History | 87 |
| Average | =AVERAGE(B2:B5) |
Goal: What score do you need in the next subject to get an average of 90?
Solution Using Goal Seek:
- Set Cell: Average
- To Value: 90
- By Changing Cell: Next subject score
Result: Excel will calculate the exact score required (e.g., 98 or similar depending on setup).
Why Goal Seek Is Powerful
Using goal seek offers several advantages:
- Eliminates manual trial-and-error
- Fast and automatic calculations
- Easy to use even for beginners
- Helps in decision-making
- Useful in both personal and business scenarios
Limitations of Goal Seek
Despite its usefulness, goal seek has some limitations:
- Only works with one variable at a time
- Requires a working formula
- May return approximate results if no exact solution exists
- Not ideal for complex multi-variable problems
For advanced scenarios, Excel’s Solver tool is more suitable.
Tips to Use Goal Seek Effectively
To get the best results from goal seek, follow these tips:
- Double-check your formula before running Goal Seek
- Ensure there are no errors (#VALUE!, #DIV/0, etc.)
- Start with realistic input values
- Avoid circular references
- Format your numbers correctly (currency, percentage, etc.)
Common Mistakes to Avoid
Here are some common beginner mistakes:
- Selecting the wrong Set Cell (must contain a formula)
- Choosing the wrong By Changing Cell
- Entering unrealistic target values
- Forgetting to update data before running Goal Seek
Goal Seek vs Solver: What’s the Difference?
While both tools are part of Excel’s What-If Analysis:
| Feature | Goal Seek | Solver |
| Variables | One | Multiple |
| Complexity | Simple | Advanced |
| Ease of Use | Very Easy | Moderate |
| Best For | Quick calculations | Optimization problems |
Use Goal Seek for quick, single-variable problems and Solver for more complex scenarios.
Conclusion
Mastering Goal Seek in Excel is a game-changer for anyone working with numbers. Whether you’re a student trying to achieve a target grade or a business owner aiming for a sales goal, this tool allows you to quickly find the exact input needed—without guesswork.
By following the step-by-step instructions and examples in this guide, you can confidently use Goal Seek to simplify your calculations and improve your productivity.
Read Also: How to Enable Macros in Excel: Step-by-Step Guide (With Examples)